10 Proven Fixes for Screen Flickering and Tearing Issues in Gray Zone Warfare on PC
“Gray Zone Warfare” has garnered a loyal following among first-person shooter fans on Steam. Its intriguing blend of PvE and PvEvP gameplay is a big draw for many. However, like numerous early-access titles, it comes with its fair share of issues. A prevalent concern among players is the screen flickering and tearing that can greatly detract from the gaming experience.
Screen flickering can create an impression of instability within the game, while tearing disrupts the visuals, leading to annoyance and distraction. Although these problems often arise in various PC games, they are not insurmountable. This article presents 10 practical solutions to help you resolve these issues in “Gray Zone Warfare.”
Understanding Flickering and Tearing Issues
Before we explore the solutions, it’s helpful to grasp the underlying causes of these problems:
- Graphics Card Limitations: When your graphics card struggles to keep pace with the game’s frame rate, tearing may occur.
- Misconfigured Settings: Incorrect in-game settings coupled with improper monitor configurations can lead to flickering.
- Internet Latency: A sluggish internet connection might also introduce visual artifacts, particularly in multiplayer modes.
Now, let’s take a look at how to tackle these issues!
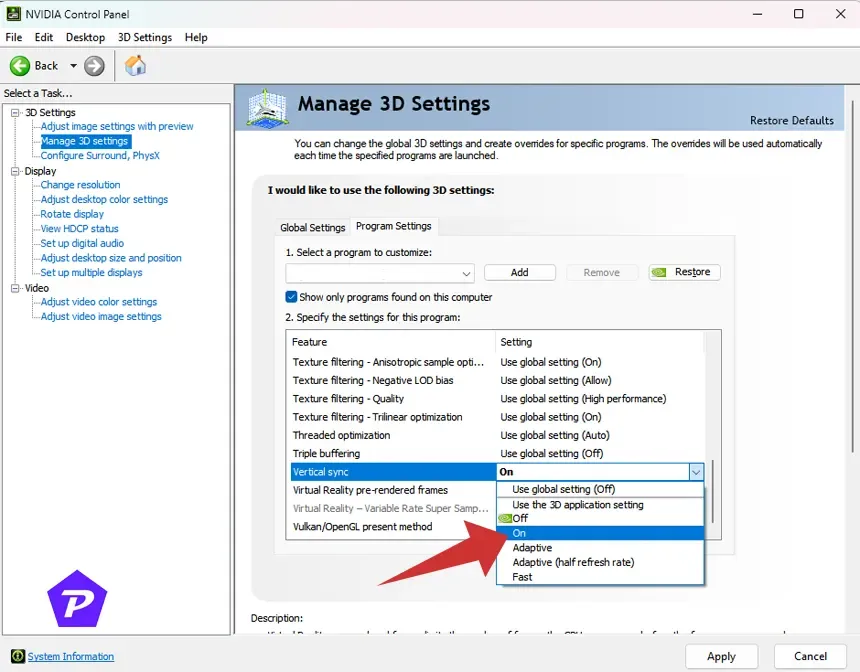
1. Activate V-Sync in Nvidia Control Panel
Enabling Vertical Sync (V-Sync) in the Nvidia Control Panel is one of the simplest and most effective methods to address screen tearing:
- Access the Nvidia Control Panel via the Start Menu.
- Navigate to 3D Settings > Select Manage 3D Settings.
- In the Program Settings tab, add “Gray Zone Warfare.”

- Find the Vertical sync option and set it to On.
- Hit the “Apply” button.
- Restart your PC and check if the issue persists.
This adjustment ensures that your GPU syncs with your monitor’s refresh rate, thereby eliminating tearing.
2. Tweak In-Game Graphics Settings
A minor adjustment in graphics settings might do the trick:
- Launch Gray Zone Warfare and head to Settings.
- Reduce texture details, shadows, anti-aliasing, and, if needed, disable V-Sync.
- Apply the modifications and restart the game.
Lowering these settings decreases the load on your hardware, which can help minimize flickering.
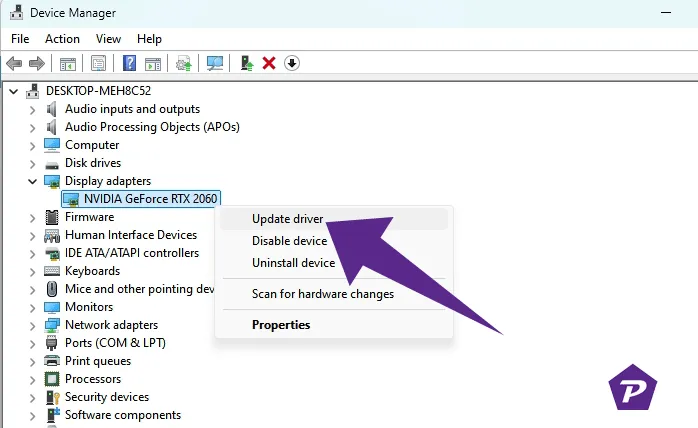
3. Update Your GPU Drivers
Keeping your graphics drivers current is crucial:
- Press Windows + X and choose Device Manager.
- Expand Display adapters and right-click on your graphics card.

- Select Update driver followed by Search automatically for drivers.
- If updates are available, proceed with installation and restart your PC.
Keeping drivers updated can significantly boost performance and resolve glitches.
4. Close Background Applications
Applications running in the background can consume valuable system resources and hinder performance:
- Press Ctrl + Shift + Esc to launch Task Manager.
- Terminate non-essential tasks, such as web browsers or media players.
- Reboot your computer and try restarting the game.
This action frees up memory and processing capacity for optimal gaming.
5. Inspect Your Internet Connection
A poor or erratic internet connection can play a role in screen issues:
- Use a wired connection instead of wireless for enhanced stability.
- Consider switching to Google DNS by navigating to Network & Internet Settings > Change Adapter Options > Properties > Internet Protocol Version 4 (TCP/IPv4).
A stable internet connection paves the way for a smoother gaming experience, particularly in online modes.
6. Ensure Game Is Up to Date
Running an older version of the game may bring along various bugs:
- Open the Steam client.
- Head to Library > Locate Gray Zone Warfare.
- If an update is available, hit the Update button.
- Restart your PC and relaunch the game.
Regular updates can fix bugs and enhance overall game stability.
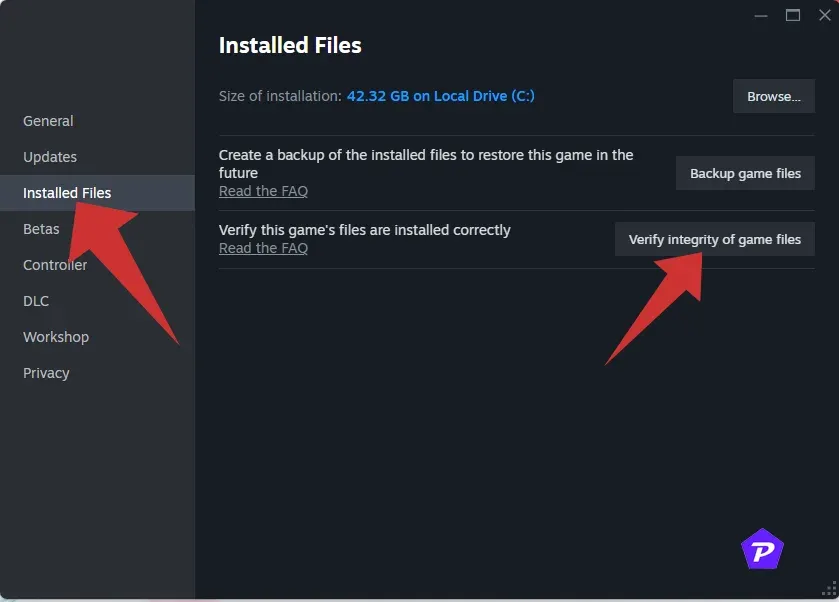
7. Check Game File Integrity
Missing or corrupted files could lead to visual discrepancies:
- Access Steam and proceed to your Library.
- Right-click on “Gray Zone Warfare” > Properties > Installed Files.

- Select Verify Integrity of Game Files.
- Once completed, restart your computer.
This step helps restore any missing or corrupted game files.
8. Enable High-Performance Mode
Optimize your PC’s performance settings:
- Go to Control Panel > Hardware and Sound > Power Options.
- Select High Performance.
- Reboot your system.
This configuration allows your computer to maximize power use for demanding gaming tasks.
9. Assign High Priority to the Game
Increase the game’s priority level to enhance performance:
- Open Task Manager and navigate to the Processes tab.
- Right-click on “Gray Zone Warfare” and choose Set Priority > High.
- Close Task Manager and start the game.
This instructs your system to allocate additional resources towards the game.
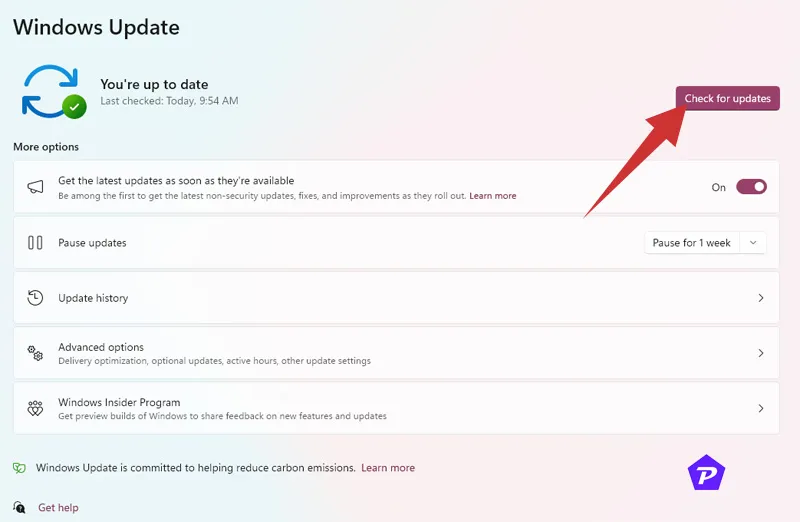
10. Keep Your Windows Operating System Updated
Updating your Windows OS can alleviate compatibility problems:
- Press Windows + I to access Settings.
- Navigate to Update & Security > Windows Update.

- Click on Check for updates and install any available updates.
- Restart your computer to implement the changes.
Regular OS updates help sustain overall system performance and health.
Extra Tips to Avoid Screen Flickering
To keep your screen stable, consider these additional tips:
- Check and adjust your monitor’s refresh rate to ensure compatibility with your GPU.
- Enable Borderless Window Mode instead of Full Screen for enhanced stability.
Final Thoughts
In conclusion, these 10 actionable steps can significantly alleviate screen flickering and tearing issues in “Gray Zone Warfare.” By implementing these suggestions, you should notice a marked improvement in your gameplay. Regularly updating your game and system can also prevent future complications. Enjoy your gaming adventure!
Image Credits: Pcmobitech.com