How to Create a Looping Presentation in PowerPoint: Step-by-Step Guide
PowerPoint is a fantastic tool for presenting your ideas in exciting ways. Sometimes, you may want to set it up to run a slide show automatically, which can be helpful for events like parties or conventions. Below is a concise guide to creating a looping slide show in PowerPoint.
Create Your Looping Slide Show
A looping slide show will automatically advance through your slides and start over at the beginning when it finishes. Here’s how to set it up:

- Open your presentation and navigate to the “Slide Show” tab.
- Select “Set Up Show” in the “Set Up” group.
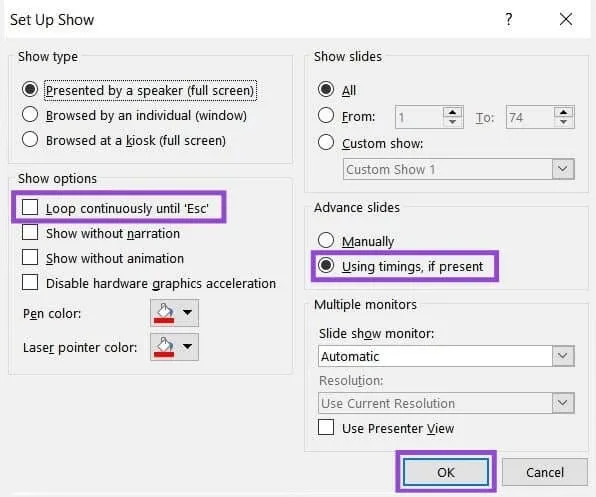
- In the “Set Up Show” window, check the “Loop continuously until ‘Esc’” box.
- Select the “Using timings, if present” option under “Advance Slides” .
- Click “OK” to confirm.
Next, establish automatic timings for your slides:

- Select all slides in the “Outline” window (click the first slide, hold Shift, and click the last slide).
- Go to the “Transitions” tab.
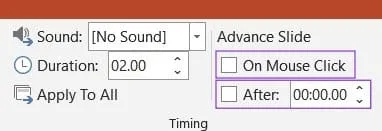
- Uncheck “On Mouse Click” in the “Timing” group.
- Check “After” option and set the desired time for slide transitions.
You can also set individual slide timings by selecting them and adjusting timings in the same way.
Exploring Other Slide Show Setup Options

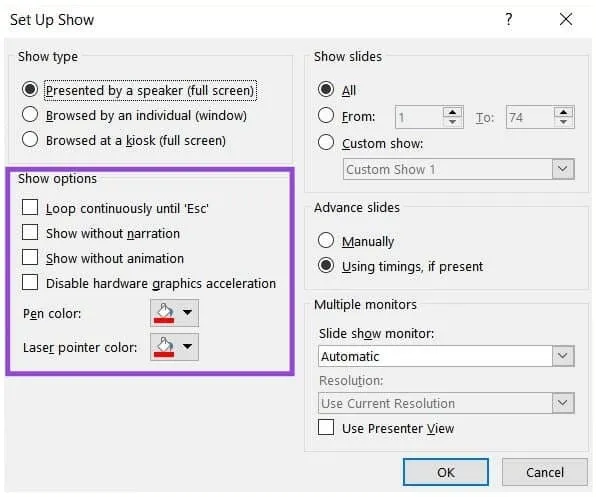
In the “Set Up Slide Show” option, you have various configurations to enhance your presentation:
Show Options
- No Narration: Disable narration during looping.
- No Animation: Turn off all slide animations for simplicity.
- Disable Hardware Graphics Acceleration: Help prevent performance issues if experiencing crashes.
- Pen and Laser Pointer Colors: Customize colors to personal preference.
Show Slides
Hide specific slides by right-clicking them in the Outline window and choosing “Hide Slide.” Use the “Show Slides” options to create a custom show:
- Select “Custom Slide Show” in the “Slide Show” tab.
- Click “New” in the pop-up window.
- Select slides to include and click “Add.”
- Arrange the order of slides using “Up” , “Down” , and “Remove.”
- Name your show and click “OK.”
Multiple Monitors
If using multiple monitors, select your display and enable “Presenter View” for better control.
Show Type
Choose how you want your show to be presented:
- Presented by a Speaker: Full screen, with loop disabled.
- Browsed by an Individual: Windowed view with loop enabled.
- Browsed at a Kiosk: Full screen with loop enabled automatically.