Resolving the Arena Breakout Infinite VRAM Error: How to Fix Not Enough VRAM Issue
Arena Breakout Infinite has swiftly become a favorite in the realm of immersive FPS gaming. However, many players are contending with a common issue – the “Not Enough VRAM” error. VRAM, which stands for Video Random Access Memory, plays a critical role in managing and rendering high-quality graphics within a game. If you’re encountering this error, there’s no need to panic. This guide outlines effective steps you can take to resolve the problem. Let’s get started!
What Does the “Not Enough VRAM” Error Mean?
VRAM is vital when it comes to playing graphically intense games. It acts as temporary storage for visual data, enabling the GPU to retrieve this data without delay. When VRAM is maxed out, players may experience slow performance, game freezes, or a direct “Not Enough VRAM” error message. This situation can be particularly prevalent in titles such as Arena Breakout Infinite, often stemming from insufficient VRAM or excessively high graphics settings that your hardware cannot support.
How to Resolve the Arena Breakout Infinite Not Enough VRAM Error

1. Verify System Requirements
Before exploring more intricate solutions, it’s essential to check that your system complies with the game’s minimum specifications.
Minimum Requirements:
- CPU: Core i5-7500 or Ryzen 5 1400
- RAM: 16 GB
- GPU: NVIDIA GTX 960, AMD Radeon RX 560, or Arc A380 with at least 4 GB VRAM
- Operating System: 64-bit Windows 10 or newer
Recommended Requirements:
- CPU: Core i7-10700KF or Ryzen 7 3700X
- RAM: 32 GB
- GPU: NVIDIA RTX 2080, AMD Radeon RX 6800 XT, or Arc A750 with at least 6 GB VRAM
If your computer does not meet these specifications, consider upgrading your hardware for a smoother gaming experience.
2. Launch the Game with Administrator Rights
Executing the game as an administrator can help resolve permission-related issues.

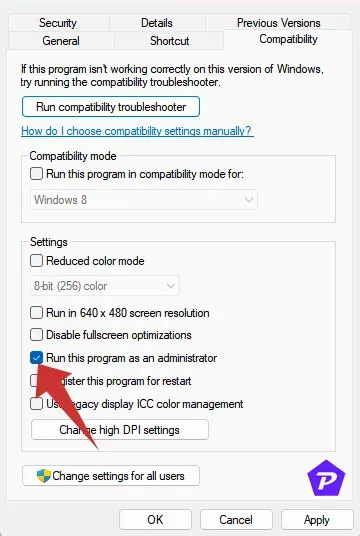
- Right-click on the Arena Breakout Infinite executable.
- Choose Properties and navigate to the Compatibility tab.
- Check the box for Run this program as an administrator.
- Hit Apply and then OK.
Perform this for the Steam or any game launcher client as well to ensure they both operate with administrator rights.
3. Update Your Graphics Drivers
Outdated graphics drivers can frequently be the source of VRAM-related issues. Here’s how to ensure yours are up-to-date:
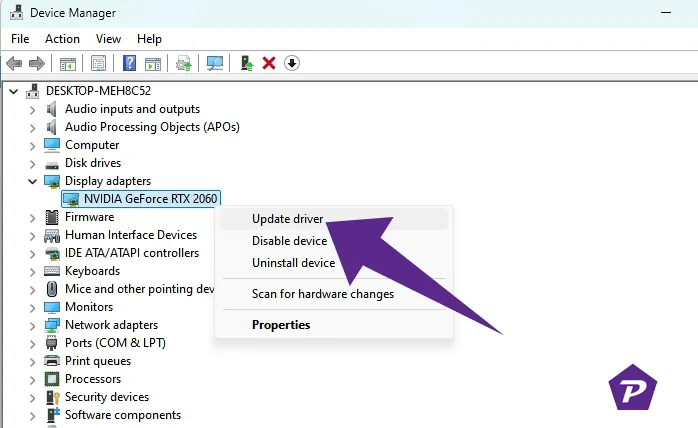
- Press
Win + Xand select Device Manager.

- Expand the Display Adapters section, right-click on your graphics card, and choose Update driver, then Search automatically for drivers.
If no updates are available, visit the official website of your GPU manufacturer (NVIDIA, AMD, or Intel) for the latest drivers.
4. Decrease In-Game Graphics Settings
Diminishing graphics settings can significantly cut down on VRAM usage:
- Launch Arena Breakout Infinite and open Settings > Graphics.
- Reduce settings such as texture quality, resolution, and anti-aliasing.
- Save the adjustments and restart the game.
This simple change can alleviate the burden on your GPU, minimizing the likelihood of performance disruption or VRAM errors.
5. Keep Arena Breakout Infinite Updated
Playing an outdated version of the game can result in a host of performance problems. Ensure automatic game updates are enabled:
- Open Arena Breakout Infinite and head to your Library.
- Select Game Settings.
- Activate Automatic Updates.
6. Check and Repair Game Files
Corrupt game files can lead to VRAM mismanagement. Here’s how to fix them:

- Arena Launcher: Navigate to Game Settings and select Repair.
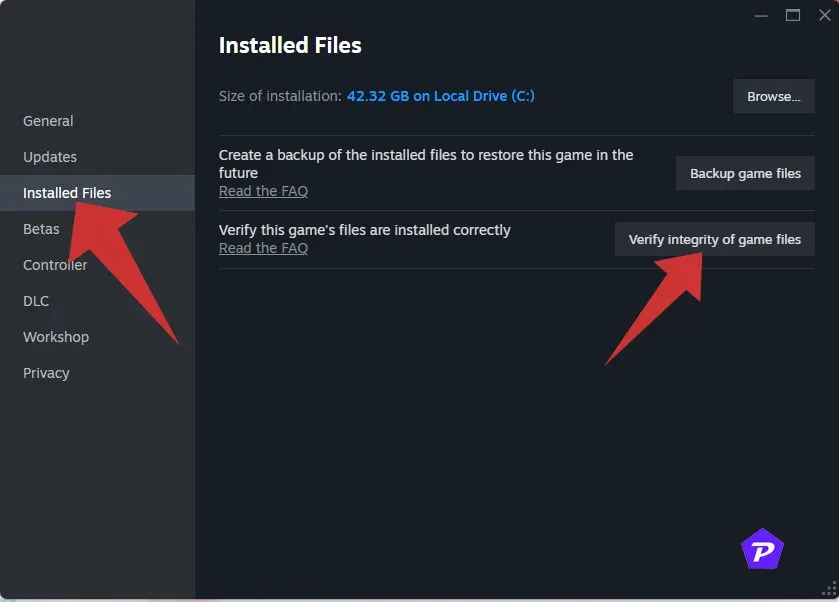
- Steam: Right-click on the game in your Library, go to Properties, select Installed Files, and click Verify Integrity of Game Files.
7. Close Unnecessary Background Tasks
Running background applications can deplete system resources and limit VRAM availability. Here’s how to close unnecessary processes:
- Press
Ctrl + Shift + Escto access the Task Manager. - Under the Processes tab, right-click on any non-essential task and choose End Task.
- Restart your PC for good measure.
8. Disable Overlay Applications
Overlay applications like Discord or the Xbox Game Bar may use VRAM and hamper performance. Here’s how to turn them off:
- Discord: Access Settings > Overlay and disable the in-game overlay feature.
- Xbox Game Bar: Open
Win + I> Gaming > Game Bar and turn it off. - NVIDIA GeForce Experience: Go to Settings > General and disable the In-Game Overlay.
9. Temporarily Disable Your Antivirus Program
Sometimes, antivirus software can disrupt VRAM allocation. You can temporarily disable it by:
- Go to Settings > Update & Security > Windows Security.
- Select Virus & threat protection, and click on Manage Settings.
- Toggle off Real-time protection.
10. Tweak Nvidia Control Panel Settings
Modifying settings in the Nvidia Control Panel can enhance VRAM efficiency:
- Right-click on your desktop and select NVIDIA Control Panel.
- Navigate to Manage 3D Settings under Program Settings.
- Find Arena Breakout Infinite and adjust the following settings:
- Max Frame Rate: Set to 60 FPS.
- Preferred Refresh Rate: Highest Available.
- Vertical Sync: Enabled.
- Click Apply and then restart the game.
11. Activate High-Performance Mode
For resource-heavy games like Arena Breakout Infinite, enabling High-Performance Mode can optimize system performance:
- Right-click on your desktop>Display Settings > Graphics Settings.
- Find Arena Breakout Infinite, click on Options, and choose High Performance.
Conclusion
Experiencing the “Not Enough VRAM” error in Arena Breakout Infinite can be a source of frustration, but with the solutions provided, you can effectively troubleshoot and resolve the issue. Methodically executing these steps and combining several approaches where needed will yield the best results. Enjoy your uninterrupted gameplay experience!
Image Credits: Pcmobitech.com