Setting the Correct Time Zone and Fixing Daylight Saving Time Issues on Your iPhone
Accurate time settings on your iPhone are vital for smooth communication, maintaining punctuality, and ensuring the proper function of various applications. While most iPhones automatically adjust to the correct time zones, there are occasions where manual adjustments are necessary, especially during Daylight Saving Time (DST) transitions or when Location Services are disabled.
The Significance of Correct Time Zone Settings on iPhone

Image Credit: Shutterstock
Setting the correct time zone on your iPhone is important for several reasons:
- Ensures that your calendar events and alarms are accurately timed.
- Provides accurate information in time-sensitive applications such as weather and GPS.
- Helps maintain synchronization with personal and business contacts in different time zones.
- Reduces confusion when traveling or adapting to daylight savings shifts.
Understanding these advantages encourages taking steps to ensure your iPhone consistently displays the correct time.
Automatically Updating Time Zones on Your iPhone
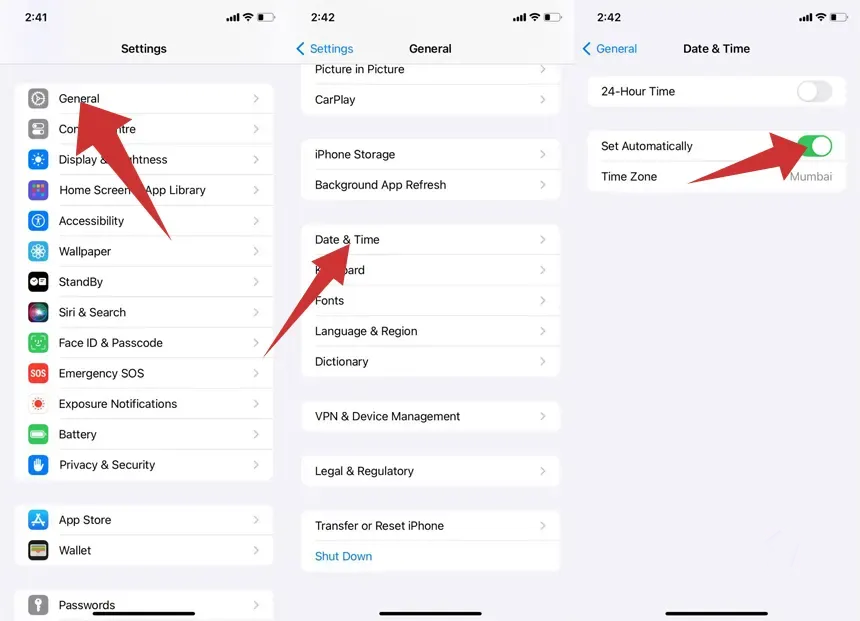
Most iPhones come pre-configured to adjust to different time zones automatically, which benefits users who travel frequently or reside in areas that observe DST. To verify this feature is enabled, follow these simple steps:
How to Enable Automatic Time Zone Adjustments

- Open the Settings App:
- Locate and tap the Settings icon on your home screen.
- Navigate to Date & Time Settings:
- Select General and then tap on Date & Time.
- Activate “Set Automatically”:
- Within the Date & Time settings, switch the Set Automatically option to the On position if it’s currently off.
By enabling this setting, your iPhone will adjust the time according to your geographic location.
Troubleshooting Time Display Issues
If you find that the time zone is not displaying correctly, it could be due to a lack of location permission for your iPhone. Here’s how to grant these permissions:
Enabling Location Access for Time Zone Settings
- Access Privacy & Security Settings:
- From the Settings menu, select Privacy & Security.
- Activate Location Services:
- Tap Location Services and toggle it on if it’s off.
- Enable Time Zone Setting:
- Scroll to System Services within Location Services.
- Ensure Setting Time Zone is enabled.
After enabling these settings, revisit the Date & Time section to check if the correct time zone and city are displayed.
Manually Adjusting the Time on Your iPhone
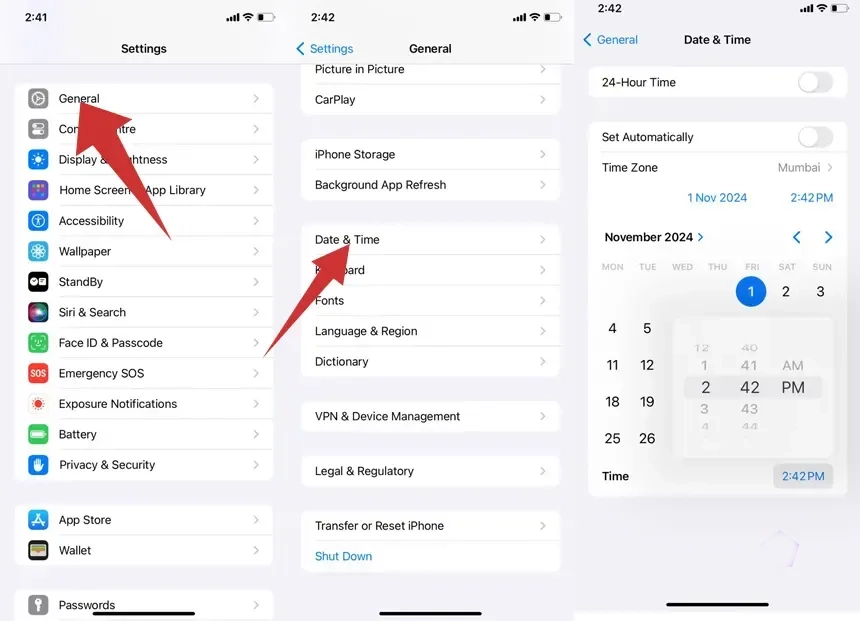
For times when you prefer manual adjustments, whether due to privacy or specific needs, follow the guide below to set your iPhone’s time by hand.
Steps for Manual Time Adjustment

- Access Date & Time Settings:
- Go to Settings and navigate to General > Date & Time.
- Disable “Set Automatically”:
- Toggle the Set Automatically option off to allow manual input.
- Adjust Time and Time Zone:
- With Set Automatically disabled, select the current time to manually set it as needed.
Common Problems with Manual Settings
If the Set Automatically option is grayed out, several factors might be causing this issue:
- Active Screen Time Settings:
- Screen Time restrictions can limit changes to period settings.
- To disable, navigate to Settings > Screen Time > Turn Off Screen Time.
- Outdated Software:
- An outdated iOS version may restrict certain features.
- To check for updates, go to Settings > General > Software Update.
- Carrier or Regional Restrictions:
- Some network providers or regions might impose restrictions on time setting modifications.
If the issues persist, consider that corporate profiles may restrict your adjustments.
Troubleshooting Daylight Saving Time on iPhone
While iPhones typically handle Daylight Saving Time adjustments automatically, certain glitches may occur. If your device isn’t updating correctly after a DST change, try the following steps:
Check if Automatic Settings Are Active
- Open Settings > General > Date & Time.
- Confirm that Set Automatically is on.
Restart Your iPhone
A simple restart often resolves minor glitches:
- Hold down the power button and swipe to power off. Afterward, turn it back on.
Ensure Your iOS Version is Up to Date
Apple frequently releases iOS updates to address DST and other location issues. Check your version by going to Settings > General > Software Update.
Location Services and Privacy Settings
To maintain accuracy in time zones and DST changes, ensure Location Services is active as discussed in earlier sections.
Adjusting Time Zones While Traveling
For traveler users, keeping the correct time zone is essential. If you want your iPhone to update based on your current location, ensure Set Automatically is activated. If you wish to keep your phone in a standard time zone (e.g., home time), turn this setting off prior to travel.
Using World Clock for Time Zone Management
The World Clock feature is beneficial for those in contact with multiple time zones:
- Open the Clock application.
- Select World Clock and click the + icon.
- Type in the desired city or time zone to add it.
Additional Strategies for Time Management on iPhone
Beyond adjusting time zone settings, several tips can help ensure your iPhone displays the correct time according to your preferences.
Using Calendar Settings for Effective Time Zone Management
The Calendar app can also be adjusted to show events in various time zones:
- Navigate to Settings > Calendar.
- Toggle on Time Zone Override.
- Select your preferred time zone for all events to be displayed accordingly.
Resetting All Settings If Problems Persist
If time-related issues continue, resetting all settings might be necessary. This action does not erase data but reverts all settings to their defaults:
- Go to Settings > General > Transfer or Reset iPhone.
- Choose Reset > Reset All Settings.
Conclusion
Accurate time and time zone settings on your iPhone are crucial, especially for users who travel often or reside in regions with DST. Whether you prefer automatic updates or manual settings, your iPhone offers flexible options to meet your needs. By following the outlined procedures, you can ensure your device displays the correct time, thereby making it easier to manage your schedule effectively.
Content and visuals contributed by Pcmobitech.com