Troubleshooting macOS Sequoia Time Machine Issues with Synology NAS: Effective Solutions to Restore Backup Connection
Essential Insights
- Users experiencing issues can try disabling the macOS firewall and any security applications, updating firmware for Synology and routers, switching to an Ethernet connection instead of Wi-Fi, and either repairing or creating a new Time Machine sparsebundle file.
- If Time Machine problems persist, alternatives such as Carbon Copy Cloner for backups are recommended, along with adjustments to firewall configurations and software updates.
If you’re utilizing a Synology NAS for backing up with Time Machine on macOS Sequoia, you might encounter difficulties such as frequent disconnections and unsuccessful backups. This problem has been notably reported by many Mac users after upgrading to the latest macOS version. While this can be annoying, there are several effective solutions that can help ensure a stable connection so that your backups proceed without issue. In this guide, we will explore actionable strategies to overcome these Time Machine backup challenges, allowing you to safeguard your data seamlessly.
- Compatibility Issues: New versions of macOS may not be compatible with older Synology software, resulting in regular disconnections during backup processes.
- Firewall and Security Software Conflicts: The firewall settings in macOS and third-party security programs may obstruct connections between your Mac and NAS, which can lead to interrupted backups.
- Wi-Fi and Network Disruptions: Challenges such as Wi-Fi MAC address rotation and DHCP issues can complicate the network, making it tough for Time Machine to sustain a reliable connection.
- Outdated Firmware: Older Synology DSM or router firmware might not be compatible with the latest macOS communication protocols, resulting in connection problems.
10 Solutions to Resolve Time Machine Backup Errors with Synology NAS on macOS Sequoia
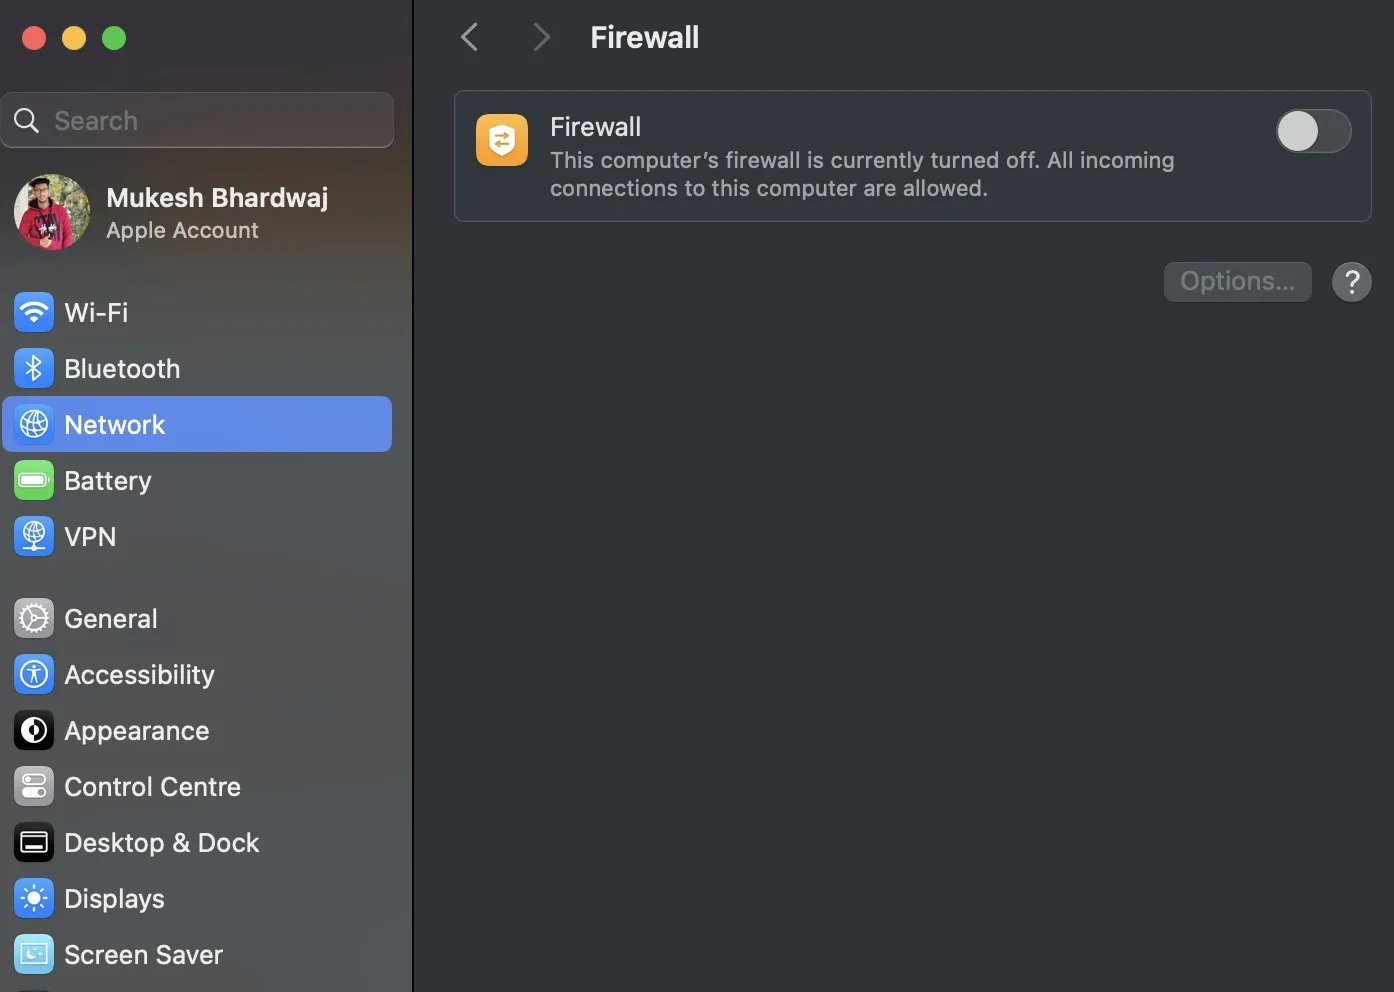
1. Disable the macOS Firewall and Any Security Software
The macOS firewall can sometimes disrupt the connection between your Mac and the Synology NAS. Additionally, third-party security applications like BlockBlock and LuLu can hinder essential network connections. To turn off the macOS firewall:
- Navigate to System Settings and select Network > Firewall.
- Switch the firewall to the off position to permit unrestricted access to the NAS during backup operations.

If security software is in use:
- Access the software settings and either disable it temporarily or whitelist Time Machine and Synology NAS connections.
Numerous users have noted that deactivating these security measures often improves connection stability during backups.
2. Update Synology DSM and Router Firmware
Keeping your Synology DSM and router firmware updated is crucial for ensuring compatibility with macOS Sequoia. Updates frequently include essential bug fixes that enhance network performance.
- Log into your Synology NAS and navigate to Control Panel > Update & Restore.
- Select DSM Update to check for available updates.
- If updates are present, follow the instructions to install them, which may require a restart of the NAS.
For router updates, visit the manufacturer’s website to download the latest firmware and adhere to provided instructions. This step is particularly vital if you use third-party routers like Netgear or Ubiquity, as having outdated firmware can lead to connectivity complications with newer macOS versions.
3. Opt for a Wired Ethernet Connection
Wireless connections often face interruptions, negatively impacting Time Machine backups. If feasible, connect your Mac directly to the NAS with an Ethernet cable. Wired connections are generally more stable and less vulnerable to drops.
- Connect one end of the Ethernet cable to your Mac and the other end to the router or directly to the NAS (if supported).
- If a complete wired setup isn’t an option, try moving your Mac closer to the router to enhance Wi-Fi signal strength and minimize disconnections.
4. Repair or Recreate the Sparsebundle File
The sparsebundle file contains your Time Machine backup data, which can become corrupted, resulting in backup failures. You can rectify this by deleting specific files within the sparsebundle or opting to recreate it entirely.
- Access your Synology NAS through DiskStation Manager (DSM) and find the sparsebundle file designated for Time Machine.
- Open the file and remove any
.plistfiles contained within. This action often resolves corruption issues. - Alternatively, consider deleting the entire sparsebundle; this means starting the backup process anew, which can take some time but is effective for resolving persistent issues.
5. Adjust SMB Settings on Synology NAS
macOS Sequoia operates optimally with SMB version 3 for network shares. Configuring your NAS to this version can stabilize the connection.
- Access Control Panel > File Services on your Synology NAS.
- Under the SMB tab, ensure that SMB3 is chosen. This setting is the most compatible with the latest macOS iterations.
- Activating Bonjour can further enhance Time Machine’s ability to recognize and connect to the NAS. You’ll find this setting in the same menu.
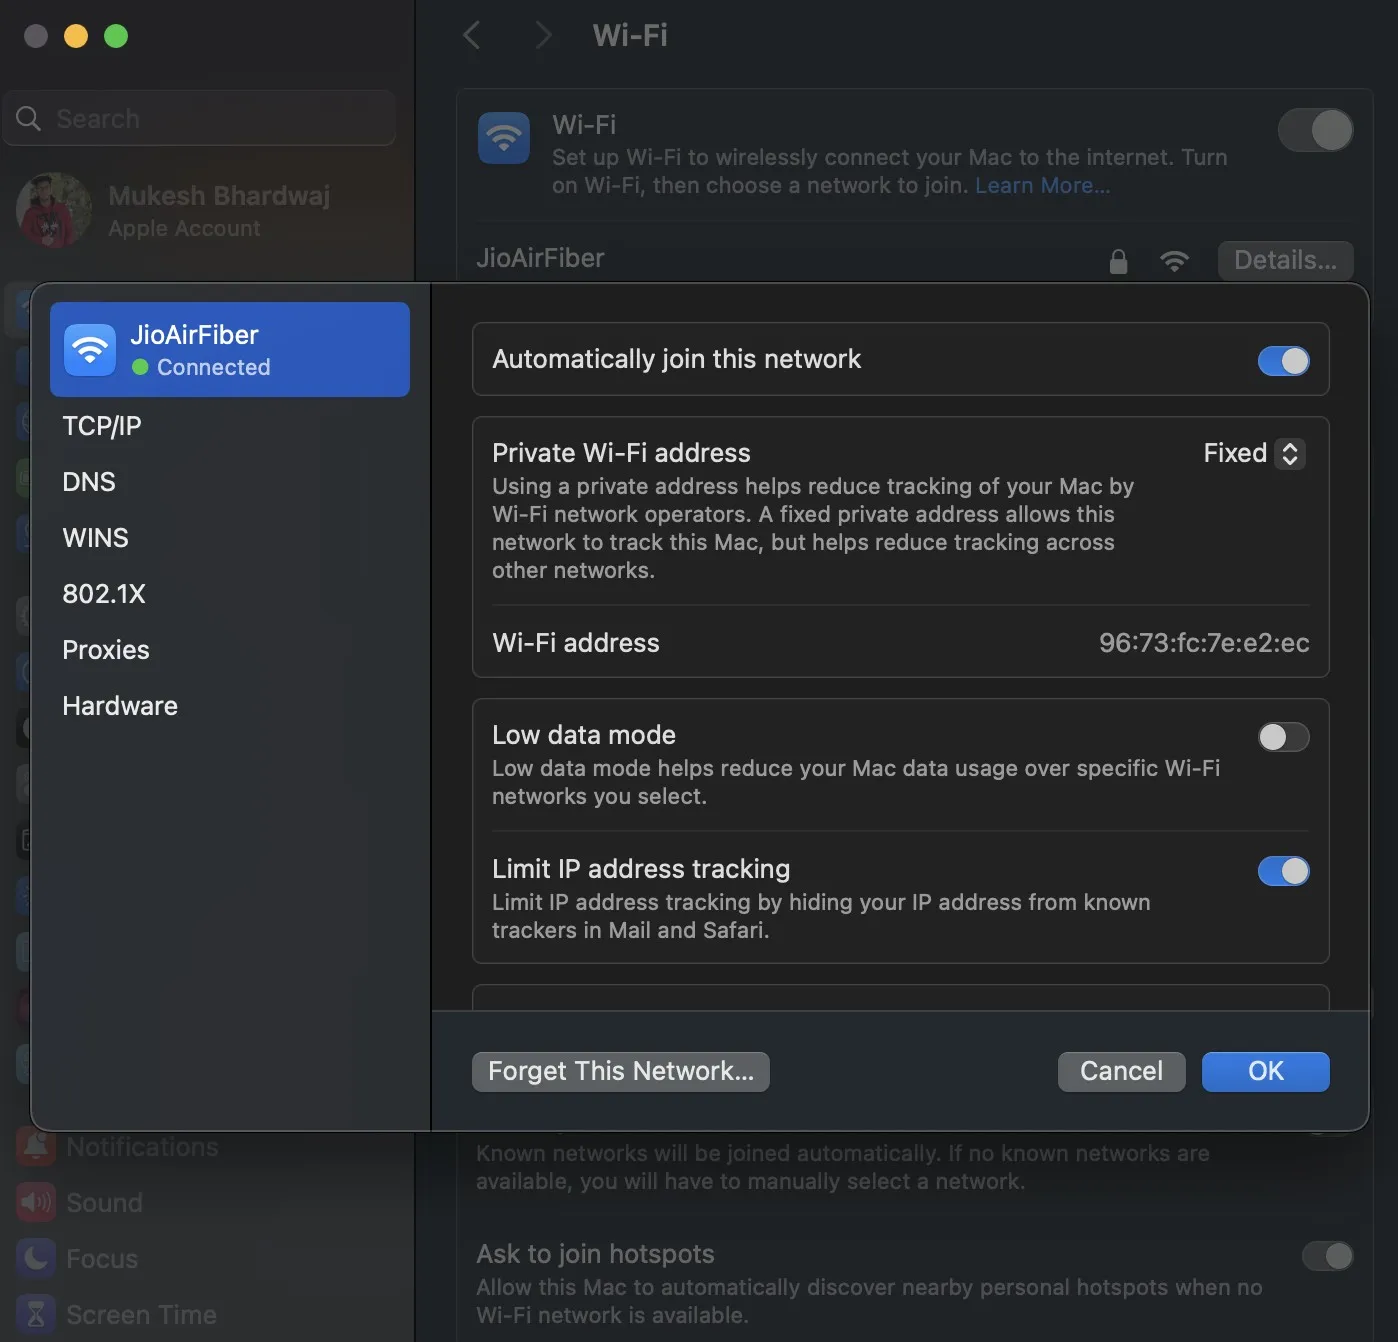
6. Set the Wi-Fi MAC Address to Fixed or Off
macOS Sequoia includes a feature that rotates the MAC address for privacy purposes, which can interfere with your connection. By setting this to a fixed address, connections can become more stable.
- Go to System Settings > Wi-Fi, find your network, and select Details.
- In the Private Wi-Fi Address section, choose either Fixed or Off. This adjustment will help keep your IP address steady and avoid interruptions due to MAC address variations.

While this may slightly reduce privacy, it significantly aids in maintaining uninterrupted connections, vital for successful backups.
7. Detach and Re-add the Time Machine Disk
Re-establishing the link between Time Machine and your Synology NAS can sometimes rectify connection problems.
- Access System Settings and navigate to Time Machine.
- Select your NAS disk and click Remove Disk.
- After removing, click Select Disk to re-add the NAS as the backup destination. This process can reset the connection and resolve configuration conflicts.
8. Temporarily Disable Anti-Virus Software
Anti-virus applications, especially those with network scanning capabilities, might interfere with your backups. Temporarily disabling them can help you determine if they are causing issues.
- Open your anti-virus software and either pause it or whitelist Time Machine along with the NAS IP address.
- Attempt to run a backup and see if the disconnection problem resolves. If it does, you may need to adjust the settings of the software to prevent future conflicts.
9. Review Time Machine Logs for Errors
If you’re uncertain about the root cause of the problem, the Time Machine logs may reveal valuable insights. Here’s how to access them:
- Open Terminal on your Mac and enter the following command:
log stream --info --style compact --predicate 'subsystem=="com.apple.TimeMachine"' - This command will display log entries related to Time Machine, helping you identify specific errors or problems.
10. Explore Alternative Backup Solutions
If Time Machine continues to be unreliable, consider utilizing alternative backup tools like Carbon Copy Cloner or Synology Drive Client. These options allow for more customized backup settings and may prove to be more stable compared to Time Machine in certain NAS configurations.
Conclusion
To effectively address Time Machine disconnection issues with Synology NAS on macOS Sequoia, it’s crucial to manage firewall configurations, keep software updated, and utilize a stable connection. Implementing these solutions will facilitate dependable backups, ensuring your data remains protected with minimal interruptions. By following these strategies, you can reduce downtime and streamline your backup process on macOS Sequoia.